This blog will guide you finish the compiling and installing a LAMP Server from source on Ubuntu step by step.
Of course, it will take you a little much time(Thanks for the 15 source packages ) ,so a cup of coffee will be a good choice 🙂
Zeroth. Here follows some source packages, which will be used when we build the LAMP.Some of them are the newest, others not.
First. check the basic system info
1. $ uname -a:
![]()
2. check whether there is gcc or not
$ gcc -v

Whoops!!!There is not,but never mind ,just install it.
$ sudo apt-get install gcc
Now, we can begin to build all the source packages:)
Second. Compile and install the source packages
2.1 install the newest libxml2 library files
2.1.1 download the libxml2-2.6.30.tar.gz from the link above or the official site, and put it into the directory /usr/local/src/, then extract it to directory libxml2-2.6.30/ and then get into that derectory. Command lines as follow:
$ cd /usr/local/usr/ // enter the directory which the source package lays
$ sudo tar zxvf libxml2-2.6.30.tar.gz // extract it
$ cd libxml2-2.6.30/ // enter the directory
2.1.2 use command “configure” to check and configure the system environment and generate the configured files. Command lines as follow:
$ ./configure –prefix=/usr/local/libxml2
the option –prefix=/usr/local/libxml2 here is to tell the installer to install it to directory /usr/local/libxml2 .When it finished, there will be a tips “Done configuring”, as the pic shows below.
![]()
2.1.3 use command “make” to compile and generate install files
$ sudo make // compile
Here comes a error:
In function ‘open’,inlined from ‘xmlNanoHTTPSave__internal_alias’ at nanohttp.c:1588:12:
/usr/include/x86_64-linux-gnu/bits/fcntl2.h:51:24: error: call to ‘__open_missing_mode’ declared with attribute error: open with O_CREAT in second argument needs 3 arguments
solution:
open and edit the nanohttp.c which is on the current directory,see the 1588th line, and modify
fd = open(filename, O_CREAT | O_WRONLY); to
fd = open(filename, O_CREAT | O_WRONLY,0777);
as the pic shows below.
![]()
2.14 use command”make install” to install the software.Command lines as follow:
$ sudo make install // install
if installed success, there will be 5 subdirectories bin, include ,lib, man and share under /usr/local/libxml2/, as the pic shows below.
![]()
*when we install php5 later, we’ll add “–with-libxml-dir=/usr/local/libxml2” to the configure options to specify the location of libxml2 library files.
2.2 install the newest libmcrypt library files
2.2.1 download the libmcrypt-2.5.8.tar.gz from the link above or the official site, and put it into the directory /usr/local/src/, then extract it to directory libxml2-2.6.30/ and then get into that derectory. Command lines as follow:
$ cd /usr/local/usr/ // enter the directory which the source package lays
$ sudo tar libmcrypt-2.5.8.tar.gz // extract it
$ cd libxml2-2.6.30/ // enter the directory
2.2.2 use command “configure” to check and configure the system environment and generate the configured files. Command lines as follow:
$ ./configure –prefix=/usr/local/libmcrypt
the option –prefix=/usr/local/libmcrypt here is to tell the installer to install it to directory /usr/local/libmcrypt.
Here will use the g++ complier, and if there is not a g++, you should first do the sudo apt-get install g++ first.
2.2.3 use command “make” to compile and generate install files
$ sudo make // compile
2.2.4 use command”make install” to install the software.Command lines as follow:
$ sudo make install // install
if installed success, there will be 5 subdirectories bin, include ,lib, man and share under /usr/local/libmcrypt/, as the pic shows below.

*when we install php5 later, we’ll add “–with-mcrypt-dir=/usr/local/libmcrypt” to the configure options to specify the location of libmcrypt library files.
2.2.5 install the libltdl library files
when finished installing the libmcrypt, enter into the directory /usr/local/src/libmcrypt-2.5.8, and then enter the subdirectory libltdl. Follow the command lines below to finish the configure, compile and install:
$ cd /usr/local/src/libmcrypt-2.5.8/libltdl // enter the directory which the source package lays
$ ./configure –enable-ltdl-install // configure it
$ make // compile
$ make install // install
if installed success, there will be a header file ltdl.h under the directory /usr/local/include,as the pic show below.
![]()
2.3 install the newest zlib library files
2.3.1 download the zlib-1.2.7.tar.gz from the link above or the official site, and put it into the directory /usr/local/src/, then extract it to directory zlib-1.2.7/ and then get into that derectory. Command lines as follow:
$ cd /usr/local/usr/ // enter the directory which the source package lays
$ sudo tar zxvf zlib-1.2.7.tar.gz // extract it
$ cd zlib-1.2.7/ // enter the directory
2.3.2 use command “configure” to check and configure the system environment and generate the configured files. Command lines as follow:
$ ./configure
you’d better not use the option –prefix=/usr/local/zlib here, because it will lead to failing to locate the zlib library when install libpng.
2.3.3 use command “make” to compile and generate install files
$ sudo make // compile
2.3.4 use command”make install” to install the software.Command lines as follow:
$ sudo make install // install
if installed success, there will be 3 subdirectories include ,lib and share under /usr/local/zlib/, as the pic shows below.
![]() *when we install php5 later, we’ll add “–with-zlib-dir=/usr/local/zlib” to the configure options to specify the location of zlib library files.
*when we install php5 later, we’ll add “–with-zlib-dir=/usr/local/zlib” to the configure options to specify the location of zlib library files.
2.4 install the newest libpng library files
2.4.1 Download the file: libpng-1.6.0.tar.gz from the above link or the official site , put it under /usr/local/src/, and extract it to libpng-1.6.0/, then enter the directory using following command:
$ cd /usr/local/usr/ // enter the directory where the source code is
$ sudo tar zxvf libpng-1.6.0.tar.gz // extract the file
$ cd libpng-1.6.0/ // enter the current directory
2.4.2 Check and configure the installation environment with “configure” command, which will generate installation configuration file. The command line as follows:
$ ./configure –prefix=/usr/local/libpng
“–prefix=/usr/local/libpng” means that the installing software will be installed under /usr/local/libpng.
ERROR: configure: error: zlib not installed
Solution at this blog: http://keping.me/2013-3-12-2/ (see the English version… I don’t like this solution but it’s the only effective one I have ever found. 🙁 )
2.4.3 use the make command to compile the source file and generate the installation file:
$ make // compile
2.4.4 use command make install to install:
$ make install // install
If the installation succeeded, there would be four directories(bin/, include/, lib/, share/)generated under /usr/local/libpng, as following picture:

* When installing the GD2 lib, it should add the option –with-png-dir=/usr/local/libpng behind configure command to locate the position of libpng file.
2.5 install the newest jpeg6 library files
2.5.1 Download the jpegsrc.v6b.tar.gz file from above link or the official site, put it under /usr/local/src/, and extract it into directory jpeg-6b/ and then enter the current directory jpeg-6b/. Commands as follows:
$ cd /usr/local/usr/ // enter the directory where the source file is
$ sudo tar zxvf jpegsrc.v6b.tar.gz // extract the file
$ cd jpeg-6b/ // enter the current directory
2.5.2 We need to create the installation directory manually when installing the jpeg6 lib files before installing the GD2. The installation directory will not be created automatically. The command as follows:
$ sudo mkdir /usr/local/jpeg6 // create a installation directory
$ sudo mkdir /usr/local/jpeg6/bin // create a directory saving commands
$ sudo mkdir /usr/local/jpeg6/lib // create a jpeg6 directory
$ sudo mkdir /usr/local/jpeg6/include // create a directory saving header files
$ sudo mkdir -p /usr/local/jpeg6/man/man1 // create a directory saving manual
2.5.3 Check and configure the installation environment with “configure” command, which will generate installation configuration file. The command line as follows: ( for displaying explicitly, use “\” to split the command for several lines):
$ sudo ./configure \
> –prefix=/usr/local/jpeg6/ \ // install the software into /usr/local/jpeg6
> –enable-shared \ // GUN’s libtool will be used when creating shared lib
> –enable-static // GUN’s libtool will be used when creating static lib
2.5.4 use the make command to compile the source file and generate the installation file:
$ make // compile
ERROR:
./libtool –mode=compile gcc -O2 -I. -c ./jcapimin.c
make: ./libtool: Command not found
make: *** [jcapimin.lo] Error 127
Solution: http://keping.me/2013-4-12/ ( see the English version…:) )
2.5.5 use command make install to install:
$ make install // install
* When installing the GD2 lib, it should add the option –with-jpeg-dir=/usr/local/jpeg6 behind configure command to locate the position of jpeg lib file.
So far, we have installed so many packages as following picture~~~Have a rest, please~~

2.6 install the newest freetype library files
2.6.1 Download the file freetype-2.3.5.tar.gz on the above link or the official site, put it under /usr/local/src/, and extract it into freetype-2.3.5/ and then enter the current directory. The commands as follows:
$ cd /usr/local/usr/ // enter the directory where the source code is
$ sudo tar zxvf freetype-2.3.5.tar.gz // extract the file
$ cd freetype-2.3.5/ // enter the current directory
2.6.2 Check and configure the installation environment with “configure” command, which will generate installation configuration file. The command line as follows:
$ ./configure –prefix=/usr/local/freetype
“–prefix=/usr/local/freetype” means that the installing software will be installed under /usr/local/freetype.
2.6.3 use the make command to compile the source file and generate the installation file:
$make // compile
2.6.4 use command make install to install:
$ make install // install
If the installation succeeded, there would be four directories(bin/, include/, lib/, share/)generated under /usr/local/freetype, as following picture:

* When installing the freetype lib, it should add the option –with-jpeg-dir=/usr/local/freetype behind configure command to locate the position of freetype lib file.
2.7 install the newest autoconf library files
2.7.1 Download the file autoconf-2.61.tar.gz on the above link or the official site, put it under /usr/local/src/, and extract it into autoconf-2.61/ and then enter the current directory. The commands as follows:
$ cd /usr/local/usr/ // enter the directory where the source code is
$ sudo tar zxvf autoconf-2.61.tar.gz // extract the file
$ cd autoconf-2.61/ // enter the current directory
2.7.2 Check and configure the installation environment with “configure” command, which will generate installation configuration file. The command line as follows:
$ ./configure
ERROR: configure: error: GNU M4 1.4 is required
Solution: $ sudo apt-get install m4
2.7.3 use the make command to compile the source file and generate the installation file:
$make // compile
2.7.4 use command make install to install:
$ make install // install
2.8 install the newest GD library files
2.8.1 Download the file gd-2.0.35.tar.gz on the above link or the official site, put it under /usr/local/src/, and extract it into gd-2.0.35/ and then enter the current directory. The commands as follows:
$ cd /usr/local/usr/ // enter the directory where the source code is
$ sudo tar zxvf gd-2.0.35.tar.gz // extract the file
$ cd gd-2.0.35/ // enter the current directory
2.8.2 Check and configure the installation environment with “configure” command, which will generate installation configuration file. The command line as follows:
$ sudo ./configure \
> –prefix=/usr/local/gd2/ \ // install the software into /usr/local/gd2
> –with-zlib=/usr/local/zlib/ \ // locate zlib
> –with-jpeg=/usr/local/jpeg6/ \ // locate jpeg6
> –with-png=/usr/local/libpng/ \ // locate libpng
> –with-freetype=/usr/local/freetype/ // locate freetype 2.x font lib
2.8.3 use the make command to compile the source file and generate the installation file:
$make // compile
ERROR: gd_png.c:16:53: fatal error: png.h: No such file or directory
Solution: http://keping.me/2013-3-13/( see the English version 🙂 )
2.8.4 use command make install to install:
$ make install // install
If the installation succeeded, there would be four directories(bin/, include/, lib/, share/)generated under /usr/local/gd2, as following picture:

* When installing the GD2 lib, it should add the option –with-jpeg-dir=/usr/local/gd2/ behind configure command to locate the position of GD lib file.
2.9 install the newest Apache server
2.9.1 Download the file httpd-2.4.4.tar.gz on the above link or the official site, put it under /usr/local/src/, and extract it into httpd-2.4.4/ and then enter the current directory. The commands as follows:
$ cd /usr/local/usr/ // enter the directory where the source code is
$ sudo tar zxvf httpd-2.4.4.tar.gz // extract the file
$ cd httpd-2.4.4/ // enter the current directory
2.9.2 Check and configure the installation environment with “configure” command, which will generate installation configuration file. The command line as follows: ( for displaying explicitly, use “\” to split the command for several lines):
$ sudo ./configure \
> –prefix=/usr/local/apache2 \ // specify the installation location of Apache
> –sysconfdir=/etc/httpd \ // specify the location saving configuration files of Apache server
> –with-z=/usr/local/zlib/ \ // specify the location of zlib
> –with-included-apr \ // using the copy of bundled APR / APR-Util
> –disable-userdir \ // requests mapped to user-specific directories
> –enable-so \ // compiled as dynamic sharing object(DSO)
> –enable-deflate=shared \ // reduce the support of transmission encoding
> –enable-expires=shared \ // support the control of the header files expiration
> –enable-rewrite=shared \ // url control based on rules
> –enable-static-support // create a support of a statically linked version
ERROR: configure: error: Bundled APR requested but not found at ./srclib/. Download and unpack the corresponding apr and apr-util packages to ./srclib/.
Solution: http://keping.me/2013-3-13-2/ (see the English version 🙂 )
2.9.3 use the make command to compile the source file and generate the installation file:
$make // compile
2.9.4 use command make install to install:
$ make install // install
If the installation succeeded, there would be twelve directories(bin/, build/, cgi-bin/, error/, htdocs/, icons/, include/, lib/, logs/, man/, manual/, modules/)generated under /usr/local/apache2, as following picture:

2.9.5 Start Apache server using following command:
$ sudo /usr/local/apache2/bin/apachectl start
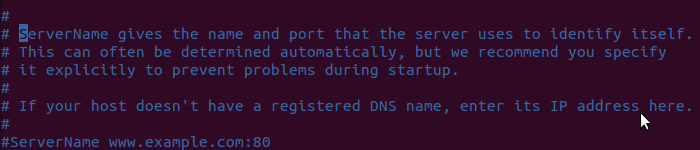
ERROR: AH00558: httpd: Could not reliably determine the server’s fully qualified domain name, using 127.0.1.1. Set the ‘ServerName’ directive globally to suppress this message
Solution: modify the file httpd.conf under the directory /etc/httpd( the location specified when installing Apache server), as following picture:

and use following command to modify the file:
$ sudo vim /etc/httpd/httpd.conf
find the location of ServerName, as following picture:
add a line “ServerName localhost” under the ServerName, as following picture:
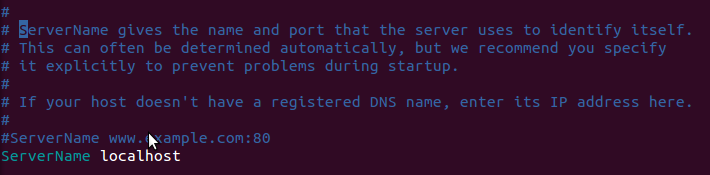
Restart Apache server with following command:
sudo /usr/local/apache2/bin/apachectl restart
To check whether it started successfully, use the grep command:
$ ps -ef | grep httpd
If there are 4/5 lines output, it started successfully, as following picture:

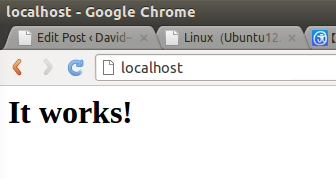
Also, we can check it by entering “localhost” in the your browser. If succeeded, the following content will occur:
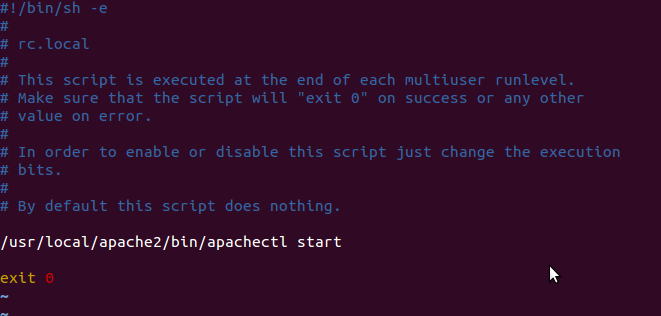
2.9.6 Run on startup
Each server software need to be configured to run on startup. About Apache, we just need to add the start command line of Apache server in the file “/etc/rc.local”. Command as follows:
$ sudo vim /etc/rc.local
2.10 install the Mysql
2.10.1 Download the file mysql-5.6.10.tar.gz on the above link or the official site, put it under /usr/local/src/, and extract it to mysql-5.6.10/, and enter the current directory. The commands as follows:
$ cd /usr/local/usr/ // enter the directory where the source code is
$ sudo tar zxvf mysql-5.6.10.tar.gz // extract the file
$ cd mysql-5.6.10/ // enter the current directory
2.10.2 Install cmake. The mysql 5.5 doesn’t use “./configure” command to configure and change to cmake, so we should install cmake. Check if there is cmake in your system with command as follows:
$ cmake -version
If there is no output as the following picture

you should install it by yourself:
$ sudo apt-get install cmake
2.10.3 Add new user group:
$ sudo groupadd mysql
2.10.4 Add new user:
$ sudo useradd mysql -g mysql
2.10.5 Create a new directory of database execution file :
$ sudo mkdir -p /usr/local/mysql
2.10.6 Create a new directory of new data file
$ sudo mkdir -p /db/mysql/data
2.10.8 Modify the directory owners:
$ sudo chown -R mysql:mysql /usr/local/mysql
$ sudo chown -R mysql:mysql /db/mysql/data
$ sudo chown -R mysql:mysql /usr/local/mysql/.
$ sudo chown -R mysql:mysql /db/mysql/data/.
2.10.8 Configure with cmake:
cmake \
-DCMAKE_INSTALL_PREFIX=/usr/local/mysql \
-DMYSQL_UNIX_ADDR=/usr/local/mysql/mysql.sock \
-DDEFAULT_CHARSET=utf8 \
-DDEFAULT_COLLATION=utf8_general_ci \
-DWITH_MYISAM_STORAGE_ENGINE=1 \
-DWITH_INNOBASE_STORAGE_ENGINE=1 \
-DWITH_ARCHIVE_STORAGE_ENGINE=1 \
-DWITH_BLACKHOLE_STORAGE_ENGINE=1 \
-DWITH_MEMORY_STORAGE_ENGINE=1 \
-DWITH_READLINE=1 \
-DENABLED_LOCAL_INFILE=1 \
-DMYSQL_DATADIR=/db/mysql/data \
-DMYSQL_USER=mysql \
-DMYSQL_TCP_PORT=3306
ERROR:CMake Error at cmake/readline.cmake:83 (MESSAGE):
Curses library not found. Please install appropriate package,
remove CMakeCache.txt and rerun cmake.On Debian/Ubuntu, package name is libncurses5-dev, on Redhat and derivates it is ncurses-devel.
Call Stack (most recent call first):
cmake/readline.cmake:126 (FIND_CURSES)
cmake/readline.cmake:193 (MYSQL_USE_BUNDLED_LIBEDIT)
CMakeLists.txt:325 (MYSQL_CHECK_READLINE)
Solution: according the prompt, install the missing package ncurses:
$ sudo apt-get install libncurses5-dev
adn then delete the cache files under current diretory:
$ sudo rm CMakeCache.txt
then reconfigure using cmake. Just copy commands above.
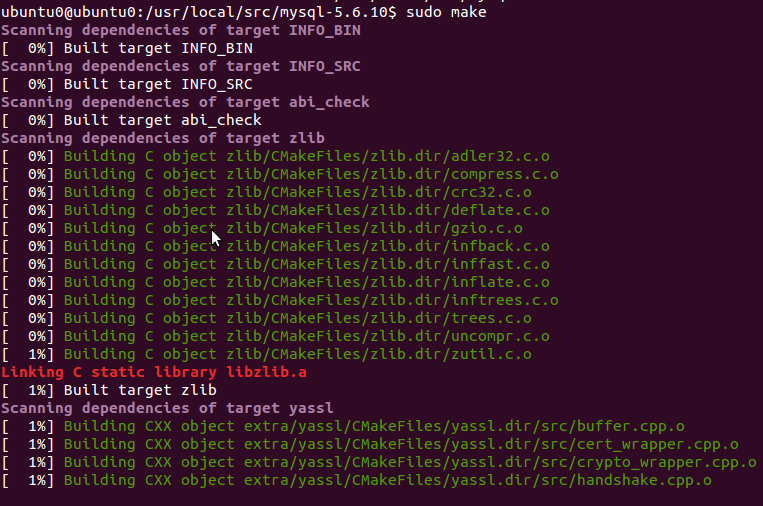
2.10.9 use the make command to compile the source file and generate the installation file:
$sudo make // compile
It shall take a long time to compile:
2.10.10 use command make install to install:
$ sudi make install // install
2.10.11 copy the configuration file
$ sudo cp /usr/local/mysql/support-files/my-default.cnf /etc/my.cnf
2.10.12 enter the installation path:
$ cd /usr/local/mysql
2.10.13 run the configuration script;
$ sudo ./scripts/mysql_install_db –user=mysql –datadir=/db/mysql/data
2.10.14 copy the service start script:
$ sudo cp /usr/local/mysql/support-files/mysql.server /etc/init.d/mysql
2.10.15 start MySQL:
$ sudo service mysql start
2.10.16 set password for root:
$ sudo /usr/local/mysql/bin/mysqladmin -u root password 123456
2.10.17 run on startup:
$ sudo update-rc.d mysql defaults
2.10.18 set mysql as system command:
$ sudo ln -s /usr/local/mysql/bin/* /bin/
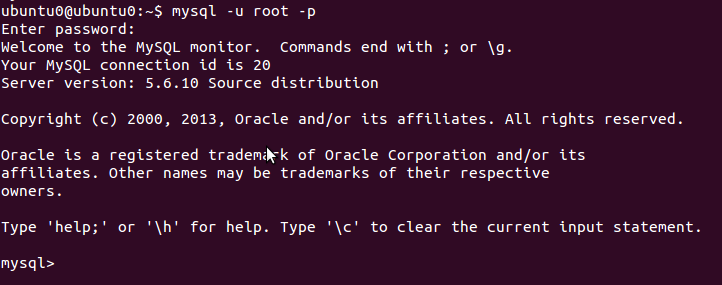
after that, just execute the following command:
$ mysql -u root -p
you can login to mysql
2.10.19 set access permission
During installing MySQL, the application mysql_install_db installed the MySQL database authorization table. This table defines the initial accounts and authorizations of MySQL, and all accounts have no passwords. These accounts are super user accounts, they can perform any operations. Root account’s initial has no password, so anyone an use the root account without password to connect to MySQL server and get all permissions, which means MySQL installation is unprotected. If you want to prevent client form connecting without password, you should specify a password for anonymous account or delete anonymous account and set a password for MySQL users. Start MySQL client console with “mysql –u root” to connect to MySQL server, command as follows:
$ mysql -u root -p
use the password set above (123456) to login, and perform:
mysql> DELETE FROM mysql.user WHERE Host=’localhost’ AND User=”;
Query OK, 1 rows affected (0.08 sec)
mysql> FLUSH PRIVILEGES;
Query OK, 1 rows affected (0.01 sec)
This means MySQL installed succeessfully~~
2.11 install the PHP
2.11.1 Download the file php-5.3.22.tar.gz on the above link or the official site, put it under /usr/local/src/, and extract it to php-5.3.22/, and enter the current directory. The commands as follows:
$ cd /usr/local/usr/ // enter the directory where the source code is
$ sudo tar zxvf pcphp-5.3.22.tar.gz // extract the file
$ cd php-5.3.22/ // enter the current directory
2.11.2 Check and configure the installation environment with “configure” command, which will generate installation configuration file. The command line as follows: ( for displaying explicitly, use “\” to split the command for several lines):
$ sudo ./configure \
> –prefix=/usr/local/php \ // set the installation path for PHP5
> –with-config-file-path=/usr/local/php/etc \ // specify the path saving PHP5 configuration files
> –with-apxs2=/usr/local/apache2/bin/apxs \ // locate Apache2
> –with-mysql=/usr/local/mysql/ \ // specify the installation directory of PHP5
> –with-libxml-dir=/usr/local/libxml2/ \ // locate libxml2
> –with-png-dir=/usr/local/libpng/ \ // locate libpng
> –with-jpeg-dir=/usr/local/jpeg6/ \ // locate jpeg
> –with-freetype-dir=/usr/local/freetype/ \ // locate freetype
> –with-gd=/usr/local/gd2/ \ // locate gd
> –with-zlib-dir=/usr/local/zlib/ \ // locate zlib
> –with-mcrypt=/usr/local/libmcrypt/ \ // locate libmcrypt
> –with-mysqli=/usr/local/mysql/bin/mysql_config \ // locate MySQLi
> –enable-soap \ // enable SOAP
> –enable-mbstring=all \ // enable multiple string
> –enable-sockets // enable socket
2.11.3 use the make command to compile the source file and generate the installation file:
$make // compile
2.11.4 use command make install to install:
$ make install // install
2.11.5 Create configuration file. Specify the location of configuration file by adding the option “–with-config-file-path=/usr/local/php/etc/” when using “configure” command to install the configuration. Copy the “php.ini- dist” file from the source directory to specified
directory “/usr/local/php/etc/” and change its name to “php.int”:
$ sudo cp php.ini-dist /usr/local/php/etc/php.ini // create the configuration
2.11.6 Integrate Apache and PHP. Before compiling PHP, we add the option “–with-apxs2=/usr/local/apache2/bin/apxs” behind the configure command to make PHP as the Apache function. But we still need to modify Apache configuration file by adding PHP support to tell Apache certain extensions as PHP parse. For example, let Apache parse files with extensions like .php and .phtml to PHP. Open Apache configuration file /etc/httpd/httpd.conf, find the line “AddType application/x-gzip .gz .tgz” and under it add a command line “Addtype application/x-httpd- php .php .phtml”. Files with any extension can be parsed to PHP, as long as we add the type to the added command and separated with backspace, as following picture:
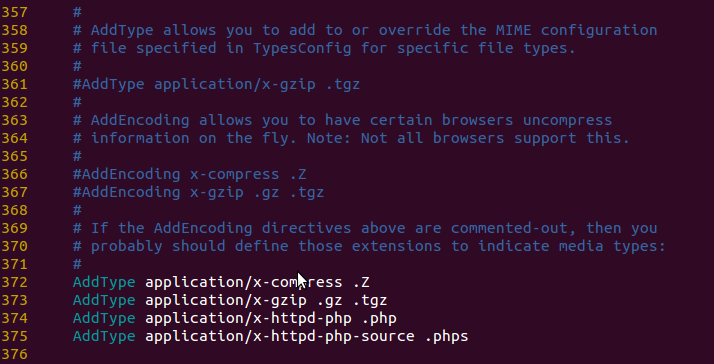
We add a line “AddType application/x-httpd-php-source .phps” in the end to take the file with .phps extensions as PHP source file for syntax highlighting.
2.11.7 Restart Apache server, for only after the restart changes of configuration file would take effect:
$ sudo /usr/local/apache2/bin/apachectl stop // stop Apache service
$ sudo /usr/local/apache2/bin/apachectl start // start Apache service
2.11.8 Test the PHP environment. Create a directory named phpinfo/ under /usr/local/apache2/htdocs and create a file named index.php. Add following lines to the file:
<?php
phpinfo();
?>
Open your browser enter the URL”http://localhost/phpinfo/index.php”, if the following picture occurs, it means your LAMP is successfully installed.
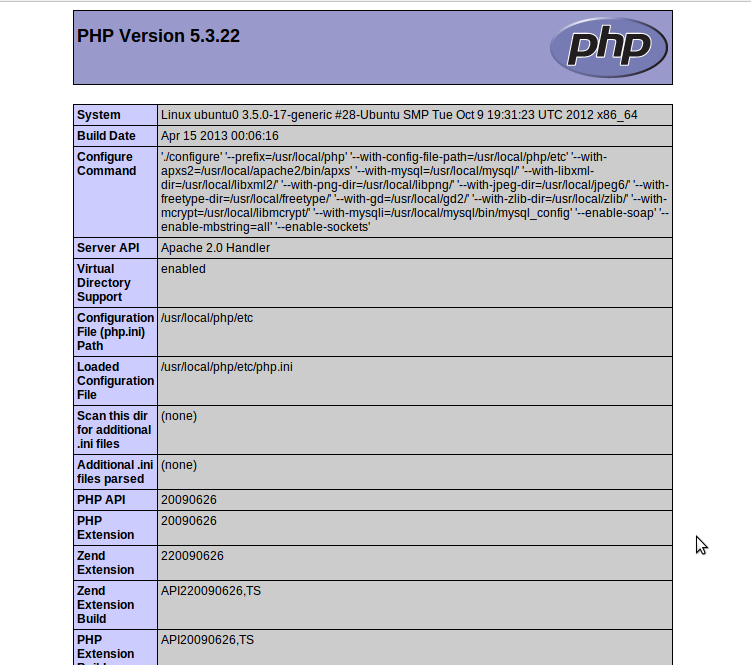
The function phpinfo() is to output most information about the PHP current status. It includes the information of compilation and extension, the PHP version, server information and environment, PHP environment, system information, path, local configuration value , HTTP header information and PHP License. Due to the different of each system’s installation, the function phpinfo() can be used to check the configuration of a particular system and available predefined variable. It’s also a valuable debug tool, because it includes all EGPCS data(Environment,GET,POST,Cookie,Server).

ahaaaaaaaaaaaaaa~
Finally, we finished it
Sophia 译
Oh, it is a wonderful blog, i’m working on this topic these days! But it seems that this is not finished yet?
finished already~,Thank you for your visit
Pingback: Installing apache,php and mysql from source in Linux
Very useful blog 🙂
I am actually grateful to the owner of this web site who has shared this impressive article at at this time.
Having read this I thought it was extremely informative.
I appreciate you spending some time and energy to
put this content together. I once again find myself spending a
lot of time both reading and leaving comments. But so what, it was still worthwhile!
Oh my goodness! Incredible article dude! Thank you,
However I am experiencing troubles with your RSS.
I don’t understand why I cannot subscribe to it. Is there anybody
else having similar RSS issues? Anyone that knows the answer can you kindly respond?
Thanx!!
seems nothing with this blog hmm?
Thank you, it’s awesome and helpful
very useful, thanks!
I also installed zlib with –prefix, then to successfully install libpng I had to run this
export CPPFLAGS=”-I/path/to/zlib/include”
export LDFLAGS=”-L/path/to/zlib/lib”
./configure –prefix=/your/path/libpng –with-zlib-prefix=path/to/zlib/directory
make
make install
Thanks for the scripts, it might help for some other people 🙂
Hello dear
your article is very awesome but here is the all links are broken please resolve it and provide new links. Thanks
Hi there,
hmmm, the download links seems all broken, maybe you can search the package name with Google.
I’ll fix it when I re-download all the packages.
Best thing ever. This just saved my life. Thx!!