最近想着用一下lucene,就过来简单的写一写,后续还会有。
网上有很多lucene学习资料,例如,lucene源码解析,大家可以去搜一下。这里只是简单介绍怎样搭建lucene所需的环境。
lucene是Apache开源基金会其中一个开源全文检索引擎工具包,是一个全文检索引擎的架构,提供了完整的查询引擎和索引引擎,部分文本分析引擎。是用Java实现的,所以要想运行lucene就需要搭建JDK环境。
Ubuntu中有自带一个openjdk功能貌似不是很强大,所以果断sun jdk走起~
下面就介绍sun jdk在ubuntu中的安装。其实安装过程是很简单的,错误都是出在环境变量的设置上。
1. 到oracle官网下载linux版本jdk:http://www.oracle.com/technetwork/java/javase/downloads/jdk7-downloads-1880260.html

我的ubuntu是32位的~
下载的包,名字如下:jdk-7u25-linux-i586.tar.gz
2. 下载完么,就要解压安装,首先在/usr/lib下建一个文件夹名为jvm。然后将压缩包解压至jvm,安装就算完成了~(就是喜欢linux这种不用点来点去的安装,还没有进度条让你抓狂~吼吼~)命令如下:
sudo mkdir -p /usr/lib/jvm/
sudo tar zxvf ~/Downloads/jdk-7u25-linux-i586.tar.gz -C /usr/lib/jvm

jdk1.7.0_25就是我们要用的~
3. 然后就是设置jdk的环境变量,终于来到容易出错的地方了。
网上有很多设置环境变量的方法,让我们来总结一下有哪几种,不过要提醒大家,修改需谨慎有可能什么命令都用不了了呢。最好复制一份出来改。。
3.1 修改/etc/profile文件:
事实证明用这个方法修改之后会对所有的用户生效,如果修改错了,所有的用户在图形界面下都进不去。。
用以下命令修改:
vim /etc/profile
在profile文件中使用:/CLASSPATH命令找到环境变量设置的地方,其实文件就一页那么点,只是想练习一下快捷键。
修改CLASSPATH如下:
 29 JAVA_HOME=/usr/lib/jvm/jdk1.7.0_25
 30 PATH=$JAVA_HOME/bin:$PATH
 31 CLASSPATH=.:$JAVA_HOME/lib/dt.jar:$JAVA_HOME/lib/tools.jar
 32 export JAVA_HOME
 33 export PATH
 34 export CLASSPATH
效果如下图:

- 要注意一个跟windows设置十分不一样的地方,就是CLASSPATH是以“:”冒号来分割的,冒号啊,不要习惯性写成分号~~~
修改之后使用:wq!命令保存退出,不过当然要进行某种操作来让修改生效,这时候就需要source命令了,命令如下:
soure /etc/profile
这就哦拉~我只是说环境变量哦拉~
ERROR,ERROR:
当然如果你不小心改错了的话,ls命令用不了了吧,再想改改profile,什么vi,vim的用不了了吧。那么恭喜你,你悲剧了一小会。不过不要捉急,vi命令和ls命令在/bin里,系统会提示你的,所以进入到/etc下,使用/bin/vi profile打开profile去掉刚才的修改,再source一下就还原了,是不是又正常了呢。。。
不过假设你在改错之后,重启了一下电脑或者想要切换一下用户,恭喜你,你要悲剧一段时间了,因为你登不进去了。。这时,可以在命令行下解决,操作如下:(神奇的linux~)
    1. shift+ctrl+alt+F1进入命令行模式
    2. 使用root身份登录
    3. cd /etc进入/etc目录
    4.使用/bin/vi profile命令打开profile进行修改
    5.:wq!保存退出
    6.重新登录,问题解决~~
3.2 修改.bashrc文件:
这个与profile的不同之处在于,在所需要的用户目录下修改之后只对该用户有效,也就是出错不会对其他用户造成影响。使用命令如下:
vim /home/username/.bashrc
或者直接 vim ~/.bashrc
打开bashrc文件,在文件末尾找到export,添加以下内容:
106 set JAVA_HOME=/usr/lib/jvm/jdk1.7.0_25
107 export JAVA_HOME
108 set JRE_HOME=${JAVA_HOME}/jre
109 export JRE_HOME
110 set PATH = ${JAVA_HOME}/bin:$PATH
111 export PATH
112 set CLASSPATH =.:${JAVA_HOME}/lib:${JRE_HOME}/lib
113 export CLASSPATH
效果如下图:

然后再使用source ~/.bashrc命令使修改生效
3.3 直接使用shell
用于在Shell下临时使用,换个Shell则无效
export JAVA_HOME=/opt/jdk1.7.0_25
export CLASSPATH=.:$JAVA_HOME/lib/dt.jar:$JAVA_HOME/lib/tools.jar
export PATH=$JAVA_HOME/bin:$PATH
4. 修改ubuntu默认jdk版本
修改完环境变量还不可以一劳永逸啊,同学,ubuntu有个自带的openjdk为默认的jdk版本,我们需要用sun jdk代替它。这时就需要用到update-alternatives命令了,首先介绍一下该命令。
update-alternatives是dpkg的实用工具,用来维护系统命令链接符,通过它可以很方便的从很多功能类似的程序和可选配置中设置系统默认使用哪个命令、哪个软件版本,例如,现在我们系统中同时安装了open jdk和sun jdk两个版本,而我们又希望系统默认使用的是sun jdk,那么通过update-alternatives就可以很方便的实现了。
使用以下命令:
sudo update-alternatives --install /usr/bin/java java /usr/lib/jvm/jdk1.7.0_25/bin/java 1062
sudo update-alternatives --install /usr/bin/javac javac /usr/lib/jvm/jdk1.7.0_25/bin/javac 1062
sudo update-alternatives --install /usr/bin/jar jar /usr/lib/jvm/jdk1.7.0_25/bin/jar 1062
sudo update-alternatives --install /usr/bin/javah javah /usr/lib/jvm/jdk1.7.0_25/bin/javah 1062
sudo update-alternatives --install /usr/bin/javap javap /usr/lib/jvm/jdk1.7.0_25/bin/javap 1062
其中1062 为alternative更改后的优先级,新更改的优先级需要大于当前的,通过update-alternatives –display java 可以查看,openjdk的优先级为1061.
然后可以使用以下命令来查看当前jdk版本:
sudo update-alternatives --config java
如下图所示,在selection number处输入0即可(我的显示如此,可能大家显示的不一样,反正只需要将jdk1.7.0_25作为默认版本的即可):

这时sun jdk成为了默认的jdk版本~
如果大家对update-alternatives的其他命令感兴趣,可以搜 一下相关的资料,在这里我们只使用了以上几个命令。
呐,做人呢要开心,现在我们就可以开心一下了,java -version一下吧~

bingo~
报告长官,jdk环境搭建完毕,请下一轮指示~
好的,小的们下面进行大会下一项,lucene安装与设置
二、Lucene的安装与配置
小的们,要用linux啊,安装过程如此简单,妈妈再也不用担心我的学习了~,再也不用对着进度条仰天长叹了~
1. 去Apache下载lucene-4.4.0.tgz: http://www.apache.org/dyn/closer.cgi/lucene/java/4.4.0
2. 解压到/usr/local/src(路径按照自己的习惯来设)下的lucene-4.4.0/中,这就算安装完了ho~
3. 下面要设置一下lucene的环境变量才能用呢。
打开lucene-4.4.0/docs/下的index.html,点击Getting Started中的Lucene demo, its usage, and sources

根据其中的Setting your CLASSPATH提示可知,需要将以下jar包放入路径中:
lucene-core-4.4.0.jar可在lucene-4.4.0/core中找到
lucene-demo-4.4.0.jar可在lucene-4.4.0/demo中找到
lucene-queryparser-4.4.0.jar可在lucene-4.4.0/queryparser中找到
lucene-analyzers-common-4.4.0.jar可在lucene-4.4.0/analysis/commen中找到
我把他们通通放到了lucene-4.4.0/目录中,这样在设置环境变量时就不用打那么多的字了
在这里我们通过修改/etc/profile来设置
将CLASSPATH修改如下图:

然后source /etc/profile使修改生效。
老大,现在可以测试一下lucene是否搭建成功了~
4. 测试:
根据上面文档中Indexing Files的描述以及实际情况,使用以下命令来测试:
java org.apache.lucene.demo.IndexFiles -docs /home/sophia/Documents -index /usr/local/src/lucene-4.4.0/index
其中-docs指定了要索引的文档的位置,-index指定了索引的存放位置。
回车就可以看到如下的效果~:
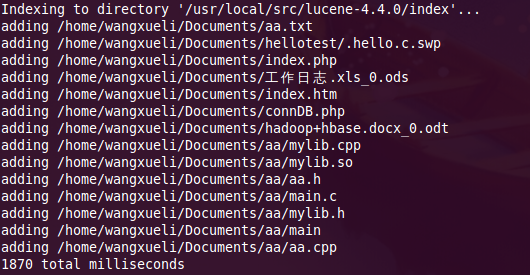
而index文件中的内容如下:

说明,我们的lucene搭建成功~
再来简单测试一下lucene的搜索功能吧~
使用以下命令:
java org.apache.lucene.demo.SearchFiles
然后在enter query中输入要搜索的内容,就可以得到包含搜索内容的文档。
hoho~~大王,今天任务已完成,简单的lucene搭建到此结束,接下来的日子,我们就要找一些相关的资料,研究一下lucene是怎样进行搜索的,以及代码实现。敬请期待~