摘要
有时候,单纯依靠 PHP “本身”是不行的。尽管普通用户很少遇到这种情况,但一些专业性的应用则经常需要将 PHP 的性能发挥到极致(这里的性能是指速度或功能)。由于受到 PHP 语言本身的限制,同时还可能不得不把庞大的库文件包含到每个脚本当中。因此,某些新功能并不是总能被顺利实现,所以我们必须另外寻找一些方法来克服 PHP 的这些缺点。
了解到了这一点,我们就到了应该接触一下 PHP 的心脏并探究一下它的内核——可以编译成 PHP 并让之工作的 C 代码——的时候了。
概述:
PHP调用动态链接库几个必要步骤为:
1. C/C++编写动态链接库,编译打包成.so文件
2. 初始化一个新的PHP扩展
3. 配置、编写PHP扩展内容,在扩展中使用C/C++调用.so
4. 编译并添加PHP扩展
5. 在PHP应用中直接调用PHP扩展里暴露出来的API
为了从能运行的最简单的例子开始,所以下面的叙述可能不会严格按照上面列的步骤来写,也有可能会重复穿插着写。但总体顺序是一致的。
一. C/C++编写动态链接库,编译打包成.so文件
如果还不会用C++调用自己写的.so库,请参考我的这篇文章:
http://keping.me/cpp_invoke_so/
文中从什么是Name Mangling开始,到如何用调用一个包含简单函数的so库,再到如何从so中加载类,都有详细叙述,并附有可运行示例代码。
二. 初始化PHP扩展
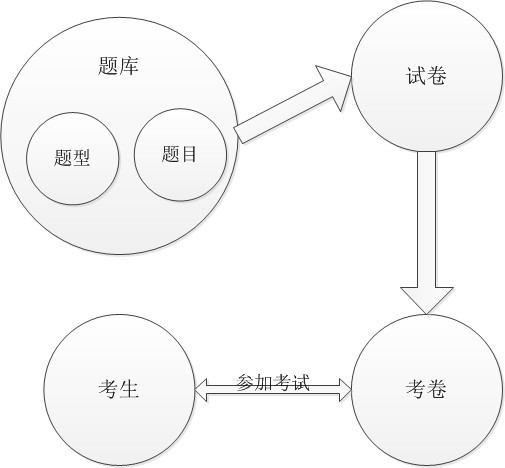
本文中,我们将创建一个叫“vehicle”的PHP扩展,其中包含一个“Car”类。
将要创建的扩展会涉及到以下文件需要修改,这些文件将会出现在vehicle目录下。后面会一一叙述这些文件是怎么来的,现在只是大致了解一下。
- car.h —— 包含了C++写的类,即Car的定义
- car.cc —— Car类的具体实现
- php_vehicle.h —— 包含了PHP创建扩展所需要的一些头文件,外部变量定义等。
- vehicle.cc —— 扩展的主要源码文件,这里面会调用到Car类
- config.m4 —— PHP扩展的配置文件
1. 需要PHP源码包
如果你不是通过源码包方式安装的PHP,而是通过apt-get install 安装的,那么首先确保你安装了 php-devel 包,然后需要下载php源代码,然后可以跳到第2步。
如果想从源码包编译安装PHP,可以参考我写的另外一篇文章《Linux(Ubuntu12.10)搭建PHP开发环境(源码包方式)》,有详细的每一步的介绍。地址为:
http://keping.me/linux-php-dev-by-source-style/
安装完成以后,跳到第2步。
2. 制作PHP外部扩展
去到PHP源码包目录的ext目录下,我的在
/usr/local/src/php-5.3.22/ext
然后输入命令
sudo ./ext_skel –extname=vehicle
该命令会在ext目录下新建一个vehicle目录,并创建新模块“vehicle”目前所需的所有文件,包括
config.m4, php_vehicle.h, vehicle.php, CREDITS等。
还会列出应该执行哪些后续步骤来使用新的扩展,具体如下图所示。
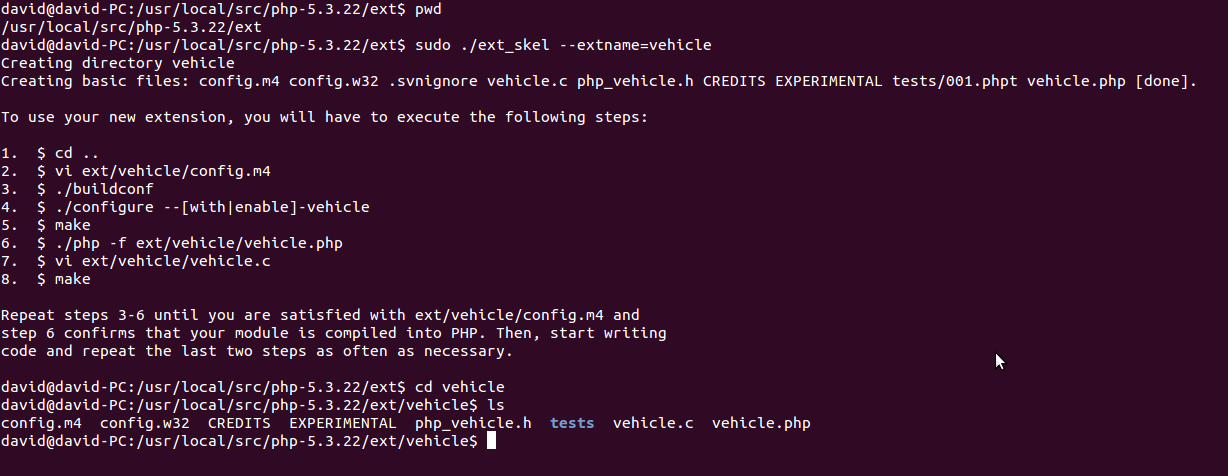
图中我一共使用了三个命令
$ pwd 显示我的php源码包的ext目录所在位置
$ sudo ./ext_skel –extname=vehicle 前面已解释
$ ls 列出了执行上一条命令以后,在vehicle目录下,为我们创建的文件及目录。
如上图所示,在它的指导步骤1~8中,大致了解到我们需要编译config.m4文件,然后需要运行配置,然后需要使用make命令编译等。现在不用知道具体都干些什么,接下来会分别叙述。
三. 配置、搭建最基本的PHP扩展骨架
1. 配置PHP构建系统——编写config.m4
首先我们需要明确的是,为了在PHP扩展中使用C++,那么必须通知PHP构建系统使用C++编译器
通过在config.m4 文件中添加宏PHP_REQUIRE_CXX()来实现。
使用C++的过程中,肯定会用到C++的一些库,至少需要标准库(libstdc++ 大多系统都是这样的)
通过在config.m4 文件中添加宏PHP_ADD_LIBRARY()来实现。
将下面的代码添加到config.m4中
PHP_ARG_ENABLE(vehicle,
    [Whether to enable the "vehicle" extension],
    [  --enable-vehicle      Enable "vehicle" extension support])

if test $PHP_VEHICLE != "no"; then
    PHP_REQUIRE_CXX()
    PHP_SUBST(VEHICLE_SHARED_LIBADD)
    PHP_ADD_LIBRARY(stdc++, 1, VEHICLE_SHARED_LIBADD)
    PHP_NEW_EXTENSION(vehicle, vehicle.cc car.cc, $ext_shared)
fi
即去掉config.m4文件中某些行前面的注释符号“dnl”,然后添加我们需要的配置。如果还不清楚,可以参考我的配置文件,内容如下图
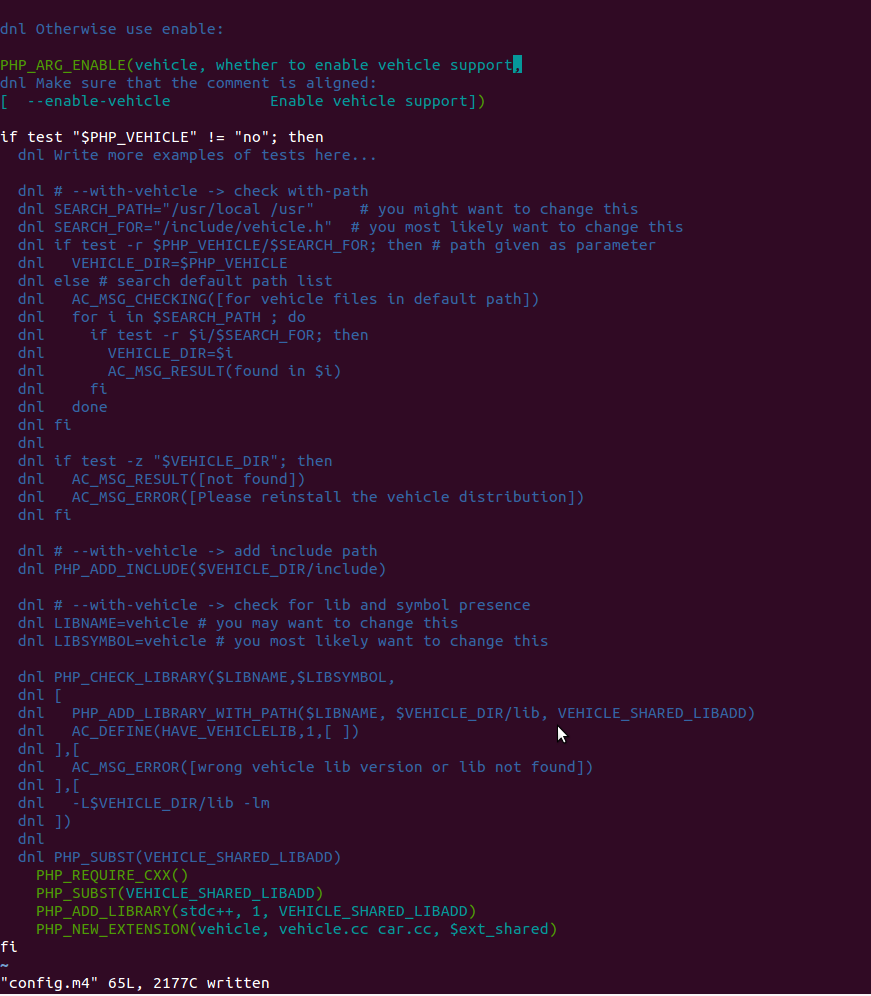
这里的宏PHP_SUBST()是标准autoconf的AC_SUBST()宏的php修改版, 它在将扩展构建为共享模块时需要。
PHP_NEW_EXTENSION宏中,第一个参数代表模块的名称;第二个参数是需要编译的文件,用空格隔开;第三个参数跟宏PHP_SUBST()是一样的。
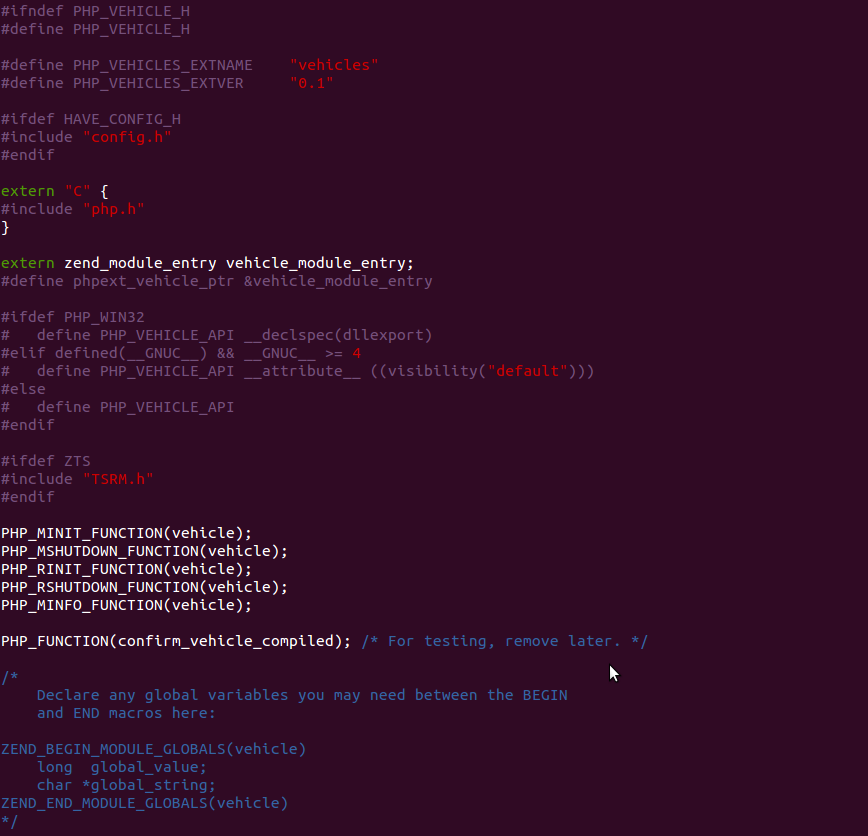
2. 编写头文件php_vehicle.h
该头文件应该包含以下内容,其中PHP_VEHICLE_EXTNAME “vehicle” 代表该扩展的名称,PHP_VEHICLE_EXTVER则代表版本号,这些都会在php_info()中显示出来。
#ifndef PHP_VEHICLE_H
#define PHP_VEHICLE_H

#define PHP_VEHICLE_EXTNAME  "vehicle"
#define PHP_VEHICLE_EXTVER   "1.0"

#ifdef HAVE_CONFIG_H
#include "config.h"
#endif

extern "C" {
#include "php.h"
}

extern zend_module_entry vehicle_module_entry;
#define phpext_vehicle_ptr &vehicle_module_entry;

PHP_MINIT_FUNCTION(vehicle);
PHP_MSUTDOWN_FUNCTION(vehicle);
PHP_RINIT_FUNCTION(vehicle);
PHP_RSHUTDOWN_FUNCTION(vehicle);
PHP_MINFO_FUNCTION(vehicle);

#endif /* PHP_VEHICLE_H */
我的php_vehicle.h文件内容如下图所示。
要理解PHP_MINIT_FUNCTION()函数,就需要了解PHP的启动步骤。大体就是
- 当我们启动Apache的时候,它就启动PHP的解释器
- PHP会调用每一个扩展的MINIT函数,可以通过查看php.ini文件来看哪些扩展模块是激活的
- MINIT就是Module Initialization,即模块初始化方法的简称,在每一个模块初始化方法里,会定义并初始化一系列在以后的页面请求中需要用到的函数、类、变量等。
- 一个典型的MINIT方法框架如下所示
[php]
PHP_MINIT_FUNCTION(extension_name) {
/* Initialize functions, classes etc */
}
[/php]
以上是PHP启动的第一步。为了先跑通整个流程,这里就不在一一叙述每一个方法以及宏的作用了。
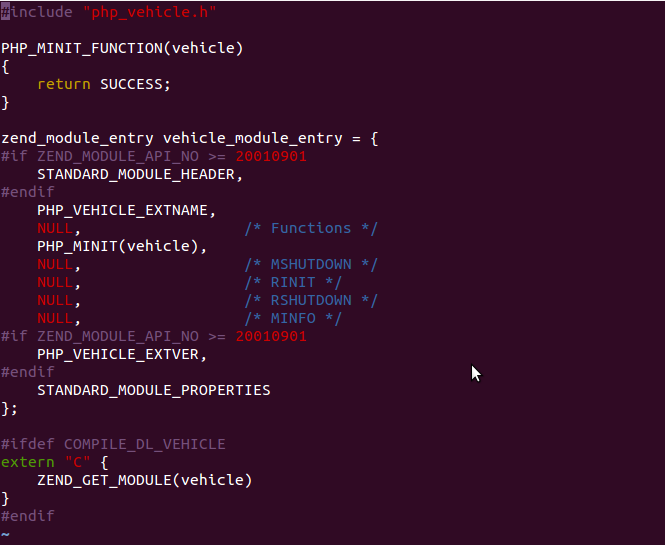
3. 编写需要编译的文件(vehicle.cc、car.cc)
使扩展能够运行的最基本的vehicle.cc框架应该包含以下内容
#include "php_vehicle.h"

PHP_MINIT_FUNCTION(vehicle)
{
    return SUCCESS;
}

zend_module_entry vehicle_module_entry = {
#if ZEND_MODULE_API_NO >= 20010901
    STANDARD_MODULE_HEADER,
#endif
    PHP_VEHICLE_EXTNAME,
    NULL,                  /* Functions */
    PHP_MINIT(vehicle),
    NULL,                  /* MSHUTDOWN */
    NULL,                  /* RINIT */
    NULL,                  /* RSHUTDOWN */
    NULL,                  /* MINFO */
#if ZEND_MODULE_API_NO >= 20010901
    PHP_VEHICLE_EXTVER,
#endif
    STANDARD_MODULE_PROPERTIES
};

#ifdef COMPILE_DL_VEHICLE
extern "C" {
ZEND_GET_MODULE(vehicle)
}
#endif
我的vehicle.cc文件如下图所示
有了这个文件,我们还不能能创建最基本的PHP扩展,因为前面我们在配置文件config.m4中指定了需要编译的还有car.cc文件,所以必须给出,即使现在里面什么也没有。
所以还需要新建一个car.cc文件,暂时让它空着。
4. 配置、编译、安装
在当前文件目录(即/usr/local/src/php-5.3.22/ext/vehicle)下执行命令
$ sudo /usr/local/php/bin/phpize
$ sudo ./configure –enable-vehicle –with-php-config=/usr/local/php/bin/php-config
如下图所示

然后执行make & make install 命令
$ sudo make
$sudo make install
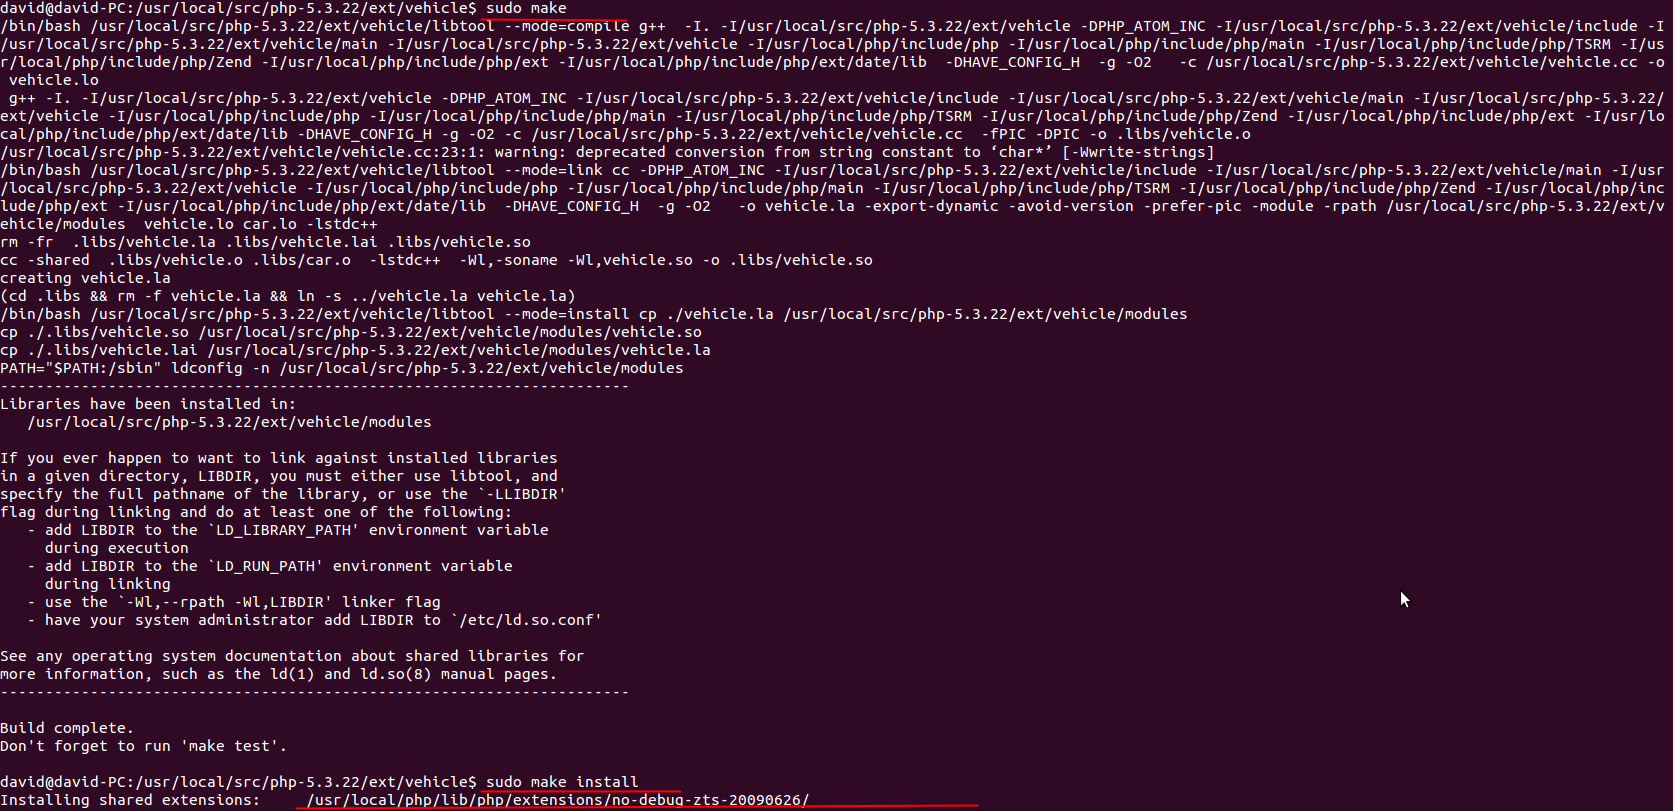
安装完成以后,会看到在
/usr/local/php/lib/php/extensions/no-debug-zts-20090626/
目录下有一个新生成的so文件,名为vehicle.so,将库该文件的路径添加到php.ini配置文件中,如下图所示。
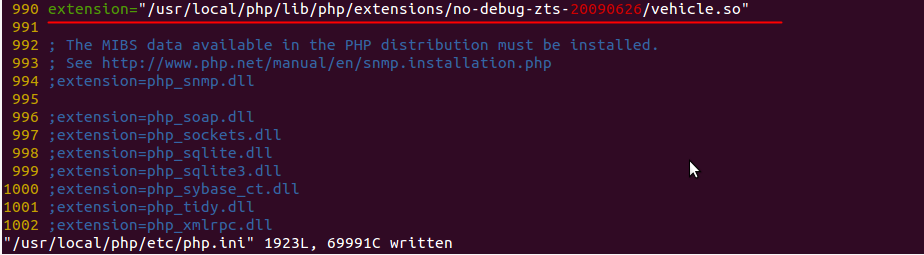
即添加这句话
“extension=”/usr/local/php/lib/php/extensions/no-debug-zts-20090626/vehicle.so”
然后重启你的apache,在phpinfo()中就可以看到已经成功启动扩展vehicle了,如下图所示。
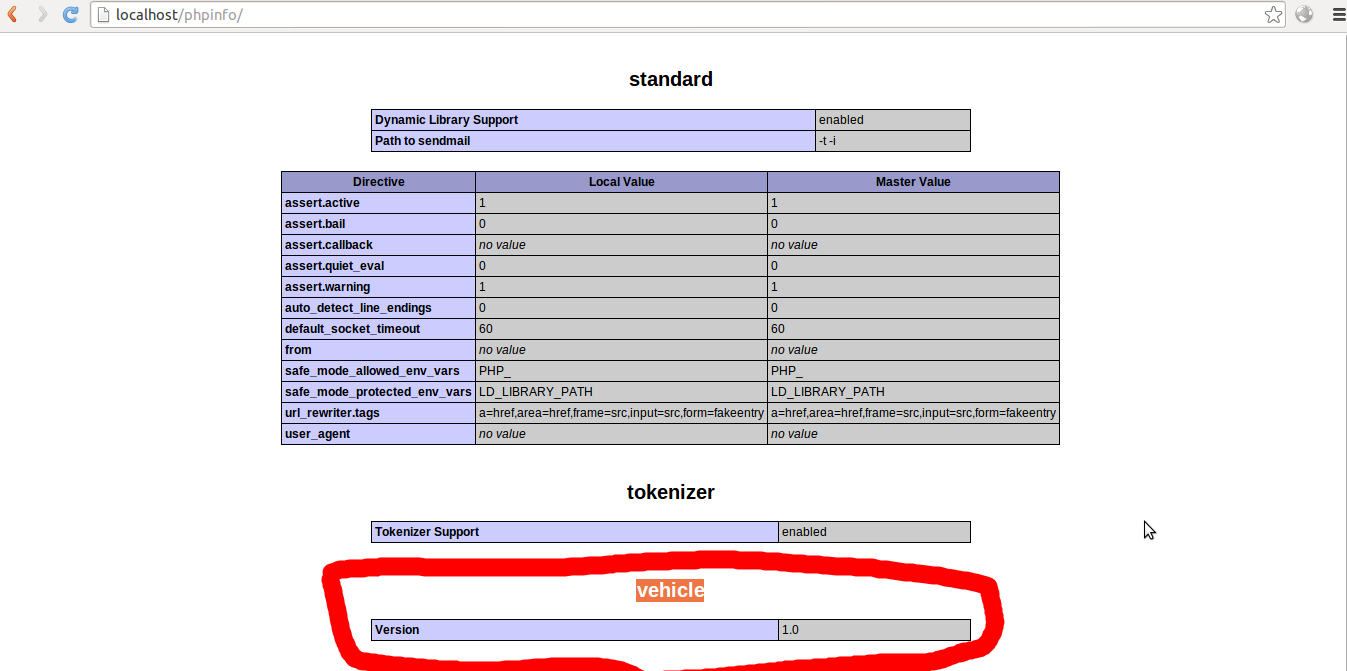
至此,最基本的框架已经搭起来了。接下来要做的工作就是如何使用PHP调用C/C++编写的so文件。先从简单的直接调用开始
四. 编写具体的PHP扩展内容
1. 编写car.h头文件
把头文件与源码文件分开是一个不错的习惯,特别是在别人不想知道你的具体实现的时候。这里我们也采取这种方式。
#ifndef VEHICLE_CAR_H
#define VEHICLE_CAR_H

// A very simple car class
class Car {
public:
    Car(int maxGear);
    void shift(int gear);
    void accelerate();
    void brake();
    int getCurrentSpeed();
    int getCurrentGear();
private:
    int maxGear;
    int currentGear;
    int speed;
};

#endif /* VEHICLE_CAR_H */
如上代码所示,我们先定义一个Car类,然后定义几个public的方法以及私有成员变量。然后在car.cc中实现它
#include "car.h"

Car::Car(int maxGear) {
    this->maxGear = maxGear;
    this->currentGear = 1;
    this->speed = 0;
}

void Car::shift(int gear) {
    if (gear < 1 || gear > maxGear) {
        return;
    }
    currentGear = gear;
}

void Car::accelerate() {
    speed += (5 * this->getCurrentGear());
}

void Car::brake() {
    speed -= (5 * this->getCurrentGear());
}

int Car::getCurrentSpeed() {
    return speed;
}

int Car::getCurrentGear() {
    return currentGear;
}
现在我们已经定义好了Car类,那么如何使其暴露给PHP用户空间,让PHP能够调用这些方法呢。
首先你需要定义一个包含有function_entry 表的PHP类来调用Car,这个function_entry 表里就包含了每一个你想暴露给PHP的C++方法。这里所指的这个PHP类就是前面提到的vehicle.cc。更新一下vehicle.cc的内容,如下所示。
#include "php_vehicle.h"

zend_class_entry *car_ce;

PHP_METHOD(Car, __construct)
{
}
PHP_METHOD(Car, p_shift)
{
}
PHP_METHOD(Car, p_accelerate)
{
}
PHP_METHOD(Car, p_brake)
{
}
PHP_METHOD(Car, p_getCurrentSpeed)
{
}
PHP_METHOD(Car, p_getCurrentGear)
{
}

function_entry car_methods[] = {
    PHP_ME(Car,  __construct,     NULL, ZEND_ACC_PUBLIC | ZEND_ACC_CTOR)
    PHP_ME(Car,  p_shift,           NULL, ZEND_ACC_PUBLIC)
    PHP_ME(Car,  p_accelerate,      NULL, ZEND_ACC_PUBLIC)
    PHP_ME(Car,  p_brake,           NULL, ZEND_ACC_PUBLIC)
    PHP_ME(Car,  p_getCurrentSpeed, NULL, ZEND_ACC_PUBLIC)
    PHP_ME(Car,  p_getCurrentGear,  NULL, ZEND_ACC_PUBLIC)
    {NULL, NULL, NULL}
};

PHP_MINIT_FUNCTION(vehicle)
{
    zend_class_entry ce;
    INIT_CLASS_ENTRY(ce, "Car", car_methods);
    car_ce = zend_register_internal_class(&ce TSRMLS_CC);
    return SUCCESS;
}

zend_module_entry vehicle_module_entry = {
#if ZEND_MODULE_API_NO >= 20010901
    STANDARD_MODULE_HEADER,
#endif
    PHP_VEHICLE_EXTNAME,
    NULL,        /* Functions */
    PHP_MINIT(vehicle),        /* MINIT */
    NULL,        /* MSHUTDOWN */
    NULL,        /* RINIT */
    NULL,        /* RSHUTDOWN */
    NULL,        /* MINFO */
#if ZEND_MODULE_API_NO >= 20010901
    PHP_VEHICLE_EXTVER,
#endif
    STANDARD_MODULE_PROPERTIES
};

#ifdef COMPILE_DL_VEHICLE
extern "C" {
ZEND_GET_MODULE(vehicle)
}
#endif
可以看到在PHP_METHOD中的函数名称与Car.cc类里写的函数名称并不需要一样,你可以定义任意自己觉得合适的函数名,为了表示方便,我这里一律添加前缀”p_”。这里每一个函数都还没有具体实现。
前面提到的function_entry表在上诉代码中可以看到由很多PHP_ME组成,每一个都代表了想要暴露给PHP用户空间的方法,最后一定以{NULL,NULL,NULL}表示结束。
现在我们已经有了C++的类,也有了PHP类,那么如何把两者联系起来呢?
首先你需要做的是定义一个zend_object_hander。然后定义一个结构,该结构包含了这个hander和C++的类。在PHP5中一个object其实就是一个hander,可以如下定义。
zend_object_handlers car_object_handlers;

struct car_object {
    zend_object std;
    Car *car;
};
该结构就会把C++的对象与zend的对象联系起来,然后你需要把下列代码添加到你的vehicle.cc文件中去,在PHP_METHOD方法之前。
void car_free_storage(void *object TSRMLS_DC)
{
    car_object *obj = (car_object *)object;
    delete obj->car;

    zend_hash_destroy(obj->std.properties);
    FREE_HASHTABLE(obj->std.properties);

    efree(obj);
}

zend_object_value car_create_handler(zend_class_entry *type TSRMLS_DC)
{
    zval *tmp;
    zend_object_value retval;

    car_object *obj = (car_object *)emalloc(sizeof(car_object));
    memset(obj, 0, sizeof(car_object));
    obj->std.ce = type;

    ALLOC_HASHTABLE(obj->std.properties);
    zend_hash_init(obj->std.properties, 0, NULL, ZVAL_PTR_DTOR, 0);
    zend_hash_copy(obj->std.properties, &type->default_properties,
        (copy_ctor_func_t)zval_add_ref, (void *)&tmp, sizeof(zval *));

    retval.handle = zend_objects_store_put(obj, NULL,
        car_free_storage, NULL TSRMLS_CC);
    retval.handlers = &car_object_handlers;

    return retval;
}
然后更新一下PHP_MINIT_FUNCTION,这个函数前面提到过,就是PHP的扩展的模块初始化函数,如下所示:
PHP_MINIT_FUNCTION(vehicle)
{
    zend_class_entry ce;
    INIT_CLASS_ENTRY(ce, "Car", car_methods);
    car_ce = zend_register_internal_class(&ce TSRMLS_CC);
    car_ce->create_object = car_create_handler;
    memcpy(&car_object_handlers,
        zend_get_std_object_handlers(), sizeof(zend_object_handlers));
    car_object_handlers.clone_obj = NULL;
    return SUCCESS;
}
可能这里对“TSRMLS_DC”这个宏比较疑惑,它其实是 “ , void ***tsrm_ls”
然后编写一下构造函数
PHP_METHOD(Car, __construct)
{
    long maxGear;
    Car *car = NULL;
    zval *object = getThis();

    if (zend_parse_parameters(ZEND_NUM_ARGS() TSRMLS_CC, "l", &maxGear) == FAILURE) {
        RETURN_NULL();
    }

    car = new Car(maxGear);
    car_object *obj = (car_object *)zend_object_store_get_object(object TSRMLS_CC);
    obj->car = car;
}
接着实现一下前面定义好的,但没有写内容的PHP_METHOD函数。为了演示的简洁,我们就实现两个函数。
PHP_METHOD(Car, p_accelerate)
{
    Car *car;
    car_object *obj = (car_object *)zend_object_store_get_object(
        getThis() TSRMLS_CC);
    car = obj->car;
    if (car != NULL) {
        car->accelerate();
    }
}

PHP_METHOD(Car, p_getCurrentSpeed)
{
    Car *car;
    car_object *obj = (car_object *)zend_object_store_get_object(
        getThis() TSRMLS_CC);
    car = obj->car;
    if (car != NULL) {
        RETURN_LONG(car->getCurrentSpeed());
    }
    RETURN_NULL();
}
记得添加所需要的头文件car.h。
然后重新 make & make install 吧,做完以后重启Apache服务器。
五. 在PHP脚本中调用扩展暴露出来的方法
编写一个PHP脚本,去测试是否成功。测试代码如下
[php]
<?php
// create a 5 gear car
$car = new Car(5);
print $car->p_getCurrentSpeed(); // prints ‘0’
$car->p_accelerate();
print $car->p_getCurrentSpeed(); // prints ‘5’
?>
[/php]
运行结果如果是0 和 5就说明成功了。
自此一个简单的PHP调用C++类已经实现了。
六. 在扩展中调用C/C++写的so库
假设现在我们有一个冒泡排序的.so库文件,现在我们想在PHP扩展中调用这个库文件里的函数
[cpp]
extern "C" void bubble_sort(int *arr, int len)
{
int tmp;
for(int i = 0; i < len – 1; i++)
for(int j = i + 1; j < len; j++)
{
if(arr[i] > arr[j])
{
tmp = arr[i];
arr[i] = arr[j];
arr[j] = tmp;
}
}
}
[/cpp]
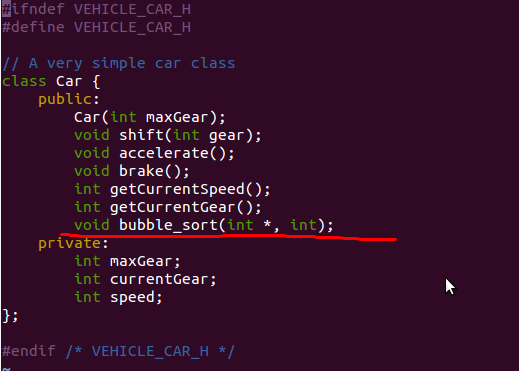
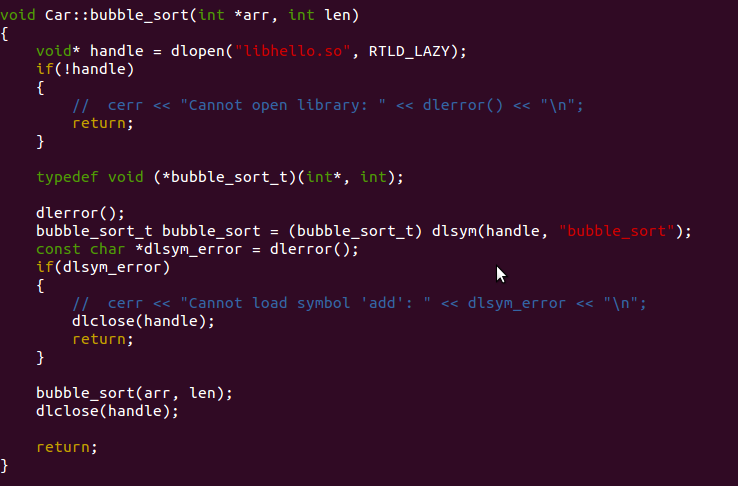
1. 更新car.h文件以及car.cc文件,添加调用so的代码,如下图所示。
car.cc 中代码如下图所示。
2. 更新vehicle.cc文件
在function_entry car_methods添加
PHP_ME(Car, p_bubble_sort_so, NULL, ZEND_ACC_PUBLIC)
然后添加一个PHP_METHOD(Car, p_bubble_sort_so),代码如下
[php]
PHP_METHOD(Car, p_bubble_sort_so)
{
zval *arr;
zval *len;
if (zend_parse_parameters(ZEND_NUM_ARGS() TSRMLS_CC, "zz", &arr, &len) == FAILURE)
{
return;
}
switch (Z_TYPE_P(arr)) {
case IS_NULL:
php_printf("NULL\n");
break;
case IS_BOOL:
php_printf("Boolean: %s\n", Z_LVAL_P(arr) ? "TRUE" : "FALSE");
break;
case IS_LONG:
php_printf("Long: %ld\n", Z_LVAL_P(arr));
break;
case IS_DOUBLE:
php_printf("Double: %f\n", Z_DVAL_P(arr));
break;
case IS_STRING:
php_printf("String: ");
PHPWRITE(Z_STRVAL_P(arr), Z_STRLEN_P(arr));
php_printf("\n");
break;
case IS_RESOURCE:
php_printf("Resource\n");
break;
case IS_ARRAY:
php_printf("Type is Array\n");
break;
case IS_OBJECT:
php_printf("Object\n");
break;
default:
php_printf("Unknown\n");
}
HashTable *arr_hash;
HashPosition pointer;
int array_count;
zval **data;
arr_hash = Z_ARRVAL_P(arr);
array_count = zend_hash_num_elements(arr_hash);
php_printf("The array passed contains %d elements\n", array_count);
// pass to the so
int *arr_so = (int*)malloc(sizeof(int) * array_count);
int len_so = array_count;
int i= 0;
for(zend_hash_internal_pointer_reset_ex(arr_hash, &pointer);
zend_hash_get_current_data_ex(arr_hash, (void**) &data, &pointer) == SUCCESS;
zend_hash_move_forward_ex(arr_hash, &pointer))
{
if (Z_TYPE_PP(data) == IS_LONG)
{
php_printf("%ld\t%ld\n", Z_LVAL_PP(data), (**data).value.lval);
arr_so[i++] = Z_LVAL_PP(data);
}
}
Car *car;
car_object *obj = (car_object*)zend_object_store_get_object(
getThis() TSRMLS_CC);
car = obj->car;
if (car != NULL)
{
car->bubble_sort(arr_so, len_so);
}
for(i = 0; i < len_so; i++)
{
php_printf("%d\n", arr_so[i]);
}
}
[/php]
这段代码还是比较容易懂的,可能会对zval这个变量不熟悉。其实所有用户定义的变量在PHP中都是用zval类型来表示的,它的内部表示如下
[c]
typedef pval zval;
typedef struct _zval_struct zval;
typedef union _zvalue_value {
long lval; /* long value */
double dval; /* double value */
struct {
char *val;
int len;
} str;
HashTable *ht; /* hash table value */
struct {
zend_class_entry *ce;
HashTable *properties;
} obj;
} zvalue_value;
struct _zval_struct {
/* Variable information */
zvalue_value value; /* value */
unsigned char type; /* active type */
unsigned char is_ref;
short refcount;
};
[/c]
然后再看上面那段代码。
switch里面是写给大家的说明程序,为了展示出如何判断传入的参数类型,可以不写略过。下面这句printf代码也是为了向大家展示 Z_LVAL_PP的用法,它其实就是对指针的指针取值,你也可以写成后面一种形式,即使**data的形式。不过建议使用第一种。
php_printf("%ld\t%ld\n", Z_LVAL_PP(data), (**data).value.lval);
接着看代码。首先我们用zend_parse_parameters接收穿过来的参数,这里我们传递的是数组。PHP中数组在zval里都是以hash表的形式储存的,所以我们这里声明一个hash表来接收这个参数。通过zend_hash_num_elements()则可以得到hash表元素的个数,也就是数组的个数。
然后我们将传递过来的参数通过for循环复制给我们的数组,最后通过调用car的bubble_sort函数进行排序。而bubble_sort调用的就是写好的so库函数了。
3. 编译、安装、测试
重新 make & make install,然后写一个PHP脚本测试一下,可以如下写:
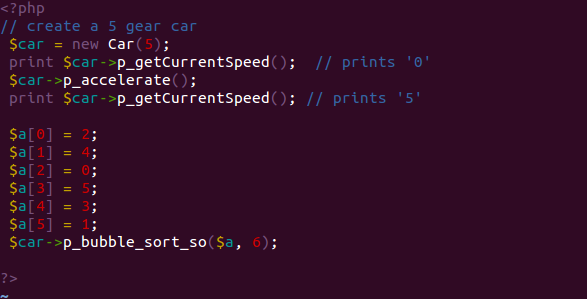
然后运行该PHP脚本,如果浏览器里出现了排序后的数列0,1,2,3,4,5,则代表成功了。
That’s all,
Enjoy!
参考文献
[1] Al-Qahtani, S. S., Arif, R., Guzman, L. F., Pietrzynski, P., & Tevoedjre, A. (2010). Comparing selected criteria of programming languages java, PHP, C++, perl, haskell, AspectJ, ruby, COBOL, bash scripts and scheme revision 1.0.Cornell University.
[2] Sterling Hughes. Extending PHP [J]. Web Techniques, 2001, 6(1), 56 – 60.
[3] PHP, http://www.php.net/manual/en/internals2.structure.php
[4] Wikipedia, PHP, https://en.wikipedia.org/wiki/PHP
[5] C++ dlopen mini HOWTO, http://www.isotton.com/devel/docs/C++-dlopen-mini-HOWTO/C++-dlopen-mini-HOWTO.html#theproblem
[6] Extension Writing Part I: Introduction to PHP and Zend, http://devzone.zend.com/303/extension-writing-part-i-introduction-to-php-and-zend/
[7] Wrapping C++ Classes in a PHP Extension, http://devzone.zend.com/1435/wrapping-c-classes-in-a-php-extension/
[8] PHP Extensions – How and Why?, http://abhinavsingh.com/blog/2008/12/php-extensions-how-and-why/
[9] How does PHP echo’s a “Hello World”? – Behind the scene, http://abhinavsingh.com/blog/2008/11/how-does-php-echos-a-hello-world-behind-the-scene/
[10] Zend API:Zend_parse_parameters, http://zhaojunjie.blog.51cto.com/5475365/945302
[11] 【翻译】PHP扩展编写第二步:参数,数组,以及ZVAL, http://weizhifeng.wordpress.com/2011/07/20/extension-writing-part2-parameters-arrays-and-zvals/
[12] php扩展 c,传参,传数组,zvar类型,全局变量, http://donbe.blog.163.com/blog/static/1380480212010225113531433/
[13] A Close Look Into PHP Zval, http://blog.jjyao.me/blog/2013/03/17/a-close-look-into-php-zval/
[14] convert_to_xxx系列函数帮助我们进行类型转换, http://9212219.i.sohu.com/blog/view/175458610.htm
[15] 深入理解php内核 编写扩展 II:参数、数组和ZVALs, http://blog.csdn.net/hguisu/article/details/7377235
[16] Zend API:深入 PHP 内核, http://xiaobin.net/wp-content/uploads/2011/09/zend/